
How to make a wedding seating chart, step by step
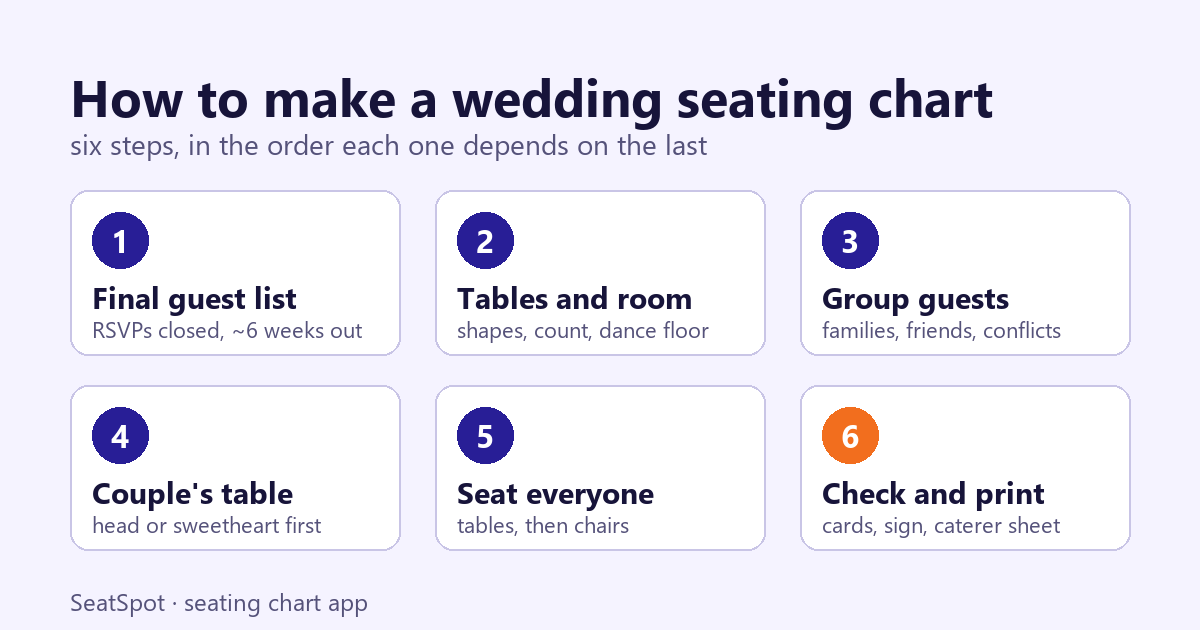
To make a wedding seating chart, close your RSVPs, decide your tables and room layout, sort guests into groups, seat the couple and families first, then fill the remaining tables and check the result before you print anything. Work in that order, about six weeks before the wedding, and the chart takes a few evenings rather than a few weeks.
How far in advance should you make a wedding seating chart?
Start the groundwork two months out and seat names only once the RSVPs are in. Joy puts the start of seating after the RSVP deadline, around three to four weeks before the wedding, when the headcount is within 5 to 10 guests of final, and says to allow at least two weeks for the chart because late replies keep changing it. The schedule below is our own, worked back from a Saturday wedding; when to make a wedding seating chart explains each date.
| Weeks before the wedding | Job |
|---|---|
| 8 | Invitations out; ask the venue which tables and room layouts are possible |
| 6 | RSVP deadline; chase everyone who has not answered |
| 5 | Settle the table count; sort guests into groups, no names in chairs yet |
| 4 | Seat the couple, families and wedding party, then everyone else |
| 3 | Check the plan, show it to both families, send the sign to the printer |
| 2 | Final chart and meal counts to the caterer and venue |
| 1 | Small swaps only; print escort and place cards |
The caterer's contract can move the two-week line. When the caterer needs your final headcount shows what to look for.
Step 1: Do you need a final guest list before you start?
Yes. Everything after this step depends on how many people are coming, so the list has to be real. Mark each guest as coming, not coming or no reply, and note plus-ones, children, meals and dietary needs, because all of them affect where people sit.
How many invited guests will say yes helps you estimate the gap early, and how to follow up on wedding RSVPs covers the calls you will make in week six. Seat the guests who said yes. Someone who has not replied is a judgement call, not a seat.
Step 2: How many tables do you need, and what shape?
Divide the number of guests by the seats per table and round up. WeddingWire calls rounds of eight to ten the most common reception table, and Joy gives 8 seats for a 60-inch round and 10 to 12 for a 72-inch round. Here is the arithmetic for common guest counts, before any head table:
| Guests | Tables of 8 | Seats (spare) | Tables of 10 | Seats (spare) |
|---|---|---|---|---|
| 50 | 50 ÷ 8 = 6.25, so 7 | 56 (6) | 50 ÷ 10 = 5 | 50 (0) |
| 100 | 100 ÷ 8 = 12.5, so 13 | 104 (4) | 100 ÷ 10 = 10 | 100 (0) |
| 150 | 150 ÷ 8 = 18.75, so 19 | 152 (2) | 150 ÷ 10 = 15 | 150 (0) |
| 200 | 200 ÷ 8 = 25 | 200 (0) | 200 ÷ 10 = 20 | 200 (0) |
A plan with zero spare seats has no room for a late yes, so add a table or switch to tables of 8 if your count lands exactly on the line. How many guests fit at a round table explains why 10 at a 60-inch round is a squeeze at a plated dinner.
Then draw the room. Greenvelope's guide starts here too: agree the table count and arrangement with the venue or caterer, and leave space for the DJ, dance floor, bar and dessert table. Mark the entrance and restrooms; the next step depends on them. How much space 100 wedding guests need has the floor-area numbers.
Step 3: How do you group wedding guests for seating?
Sort everyone into groups by how they know you: each side's family by branch, college friends, work friends, neighbors. WeddingWire suggests labels like "relatives on Mom's side" and splitting a group across several tables when it is too big for one. Then work through the special cases:
- Couples and plus-ones sit together. Joy suggests seating a plus-one with their partner's friend group.
- Conflicts go at different tables. For one of the most common, see how to seat divorced parents at a wedding.
- Elderly guests sit away from the band or the speakers and close to an exit and the restrooms. WeddingWire and Joy both say this.
- Children sit with their parents. Joy suggests a separate kids' table only once more than 10 children are coming, placed near the parents and away from the bar and the speakers.
- Guests with mobility needs sit near an accessible entrance with a clear path to the restrooms. Confirm the route with the venue.
- Single guests are better mixed into tables of people they know than collected at a "singles table", a point WeddingWire and Joy share.
Step 4: Should you have a head table or a sweetheart table?
Decide this before anyone else is seated, because it sets the front of the room. Greenvelope describes three versions: a long head table facing the guests with the wedding party on either side of the couple, the wedding party around one long table in the center, or a sweetheart table for just the two of you with the wedding party at their own table with their dates. A fourth option is a regular round with immediate family.
Parents come next. Greenvelope suggests seating each set of parents at its own table, at about the same distance from the couple, and asking both families who they would like with them. Joy adds that parents' tables should have a clear view of the dance floor and the speeches.
Step 5: Should you assign tables or exact seats?
Assigning tables is enough for most weddings. Zola explains the difference: an escort card sends a guest to a table and lets them choose any chair there, while a place card names a specific chair. Zola notes that some venues want exact seats so the catering staff can serve each pre-ordered meal to the right person, so ask yours before you decide.
Either way, fill the couple's, family and wedding party tables first, then seat the other groups largest first, because a group of nine is harder to place than a couple. Leave one or two spare chairs across the room for a late reply.
Step 6: How do you check a seating chart before printing?
Go through the plan table by table and look for these:
- Every guest who said yes has a seat, and nobody who declined still holds one.
- No table is over its capacity.
- Nobody from a conflict pair shares a table.
- Each couple, family and plus-one sits together, or apart on purpose.
- Older guests and anyone with a mobility need are near an exit, not beside the speakers.
- No table stands on the dance floor or blocks a path to the bar or the door.
Then show the chart to both families; they know feuds you do not.
What do you print from the seating chart, and for whom?
Four documents come out of one chart, and each has a different reader:
| Document | Reader | What it says | Detail |
|---|---|---|---|
| Escort cards or seating sign | Guests at the entrance | Name and table | Sorted alphabetically by last name |
| Place cards | Guests at the table | Name, sometimes the meal | Only if you assign chairs |
| Seating by table | Venue staff and servers | Who sits at each table, with meals and notes | Includes empty tables |
| Meal counts | Kitchen | How many of each dish, allergies | Attending guests only |
Joy recommends listing guests alphabetically by last name on a board rather than by table; alphabetical or by table weighs the two. Zola suggests matching table signs to the numbers on the cards and underlining a 9 so it is not read as a 6. For the sign itself see what size a seating chart sign should be, and for cards how to print place cards at home.
What do you do about seating changes on the wedding day?
Expect a few. Joy suggests a final review the night before for cancellations and added plus-ones, bringing spare escort cards and a pen to the venue, and giving the final chart to the venue coordinator and the day-of coordinator.
Doing this in SeatSpot: a 120-guest wedding
Here is a 120-guest wedding built step by step, using only what the app does today. A list this size needs SeatSpot Pro or a one-event pass, because the free plan holds one table and 8 guests.
- Create the event as a Wedding. The event type decides how guests get seated automatically: at a wedding, smart fill keeps each group at one table.
- Load the guest list. Paste a list of names, add people from your contacts, or paste rows copied from a spreadsheet. A line like "Anna & Tom Kowalski" becomes two guests in the Kowalski family, which is the group they will be seated with. Each guest gets an RSVP status: Not sent, Sent, Maybe, Attending or Declined. Marking someone as Declined frees their seat at once.
- Mark the special cases. On each guest, choose their side (the couple's names come from the event title), add tags such as Accessible, Has infant, Child or Speaker, and list anyone they should not sit with. That rule is saved on both guests.
- Build the tables. Open Table setup and pick the Banquet template: round tables of 8 plus a head table of 6. With 120 guests, the head table takes 6, leaving 114. Our arithmetic: 114 ÷ 8 = 14.25, so 15 rounds of 8, 126 seats in all. The card above the button shows the app's own count before you build anything, and the room grows deeper if the tables do not fit. For a sweetheart table, add one more table and set its seats to 2. See room templates.
- Draw the room. Tap Area and add the dance floor, bar, stage and entrance where they really are. Smart fill uses them: guests tagged Accessible or Has infant are placed near the entrance and away from the dance floor, and a guest tagged Speaker near the stage.
- Seat everyone. Seat the couple's and parents' tables by hand, dragging a guest onto a chair. Then run smart fill for the rest. It seats only guests marked Attending, largest group first, avoids do-not-seat-with conflicts where it can, and reports what it could not do, for example "1 party split".
- Check the plan. Guests → Guest report → plan check lists two people who should not sit together at one table, tables standing on an area, and families spread over several tables. If a family split is intended, tick Sitting apart is intentional. See plan check.
- Print. From the Guest report, export Seating by table for the venue (each guest's tags, such as Accessible, and notes print with their name), Meal counts for the caterer, the Welcome board as Letter pages or an 18 × 24 or 24 × 36 inch poster, and Table signs. The Cards tab prints escort cards four to a page or fold-over place cards six to a page. See exports.
- On the day. Drag a guest onto someone else's chair and the two swap places. Reprint the escort card of anyone you moved. Door list, under On the day on the Guest report, finds a guest's table by name, with no connection needed.
SeatSpot is available on Google Play and the App Store.
Questions people ask
How long does it take to make a wedding seating chart?
Joy suggests allowing at least two weeks, because late RSVPs keep changing it. The seating itself takes a few evenings once your groups are sorted; the two weeks are for replies, family review and printing.
Do you need a seating chart for a small wedding?
Joy recommends one for any wedding above about 30 guests. Greenvelope adds that guests at a buffet can seat themselves, but a chart is worth having when the meal is served at the table.
Where should elderly guests sit at a wedding?
Away from the band and the speakers, close to an exit and the restrooms, and at a table where they can still see the speeches.
Created by Mariusz Bednarczyk and fact-checked against the sources above. He reads each post after publication. How we make posts: About the blog.
Plan it next
Related guides
- How to choose a seating chart app: an honest guide
- How to seat wedding guests who don't get along
- Wedding singles table: should you have one?
More in Seating charts and etiquette